Posted by & filed under Backlinking, SEO Blog.

Ever since we started using Raven Tools, we’ve been dying for them to release a Chrome version of their toolbar, and they finally pulled through. They’ve had a Firefox version for a while now, but we all use Chrome as our primary browser (for many reasons) so we haven’t been able to use it. For those of you not familiar with Raven Tools, its one of the most comprehensive tools we use to manage SEO for our sites and our client sites. I highly recommend it for anyone who can justify the $99/mo. and is serious about pursuing SEO on their own or as a freelance SEO.

We’ll do a more in depth post on why and how you should use Raven Tools later on, but for now we’ll show you where to get the Chrome Extension and how to use it.

First, start using Chrome if you’re not already. Then go here: Raven Tools Chrome Extension and add the toolbar to chrome. Once you have it installed it, you should see a Raven icon on the top right of your browser like this:

Raven Tools Chrome Extension

After you’ve installed the toolbar, make sure you are signed into your Raven Tools account (just click on the icon and the toolbar will drop down enabling you to sign in). Assuming you already have an account and profiles setup, we’ll move on to some of the toolbar features.

The Good

Overall I love it because it allows me to keep track of my links quickly and easily while I’m browsing the Internet. Here are a few highlights of the features:

  • -You can easily switch between profiles and websites if you are managing multiple websites.
  • -Once you’ve added a link to a site, you can easily add it to your links for tracking (opens in a popup window which is a plus!).
  • -Discover and add new contacts for websites while you are browsing them.
  • -Share easily to any social media profiles you have connected to Raven Tools (and you can schedule posts as well)
  • -Create notes for specific profiles, websites, and blogs.
Raven Chrome Toolbar

What’s Missing?

The two things I noticed that were missing or could use some improvement are the research and SERP overlay features. This is minor, but I wish the “Research” link in the toolbar opened in a popup rather than bringing me to the Raven website in a new tab. If you are spending a lot of time researching sites and creating links, you want to be able to perform your research without having to draw your eyes away from the site you are currently on. If Research Central popped up in a popup window instead, you would be able to do your research quickly without having to leave the window you are working on which will save you some time in the long run.

The second improvement that I hope is made in the future is some sort of SERP overlay for Google and Bing search results. There are other extensions like the SEOmoz toolbar that do this, but if Raven Tools incorporated this feature it would make their toolbar one of the most comprehensive available. Below is a screenshot of what I’m talking about, but basically this feature allows you to get a quick snapshot of a sites link profile as you are searching and also as you are actually browsing that site. Its not crucial to have this information readily available like that, but it does make life a lot easier. This is of course the first version, so I’d imagine this feature will be added in the future.

SEOmoz SERP Overlay

Overall, its a great addition to an already stellar SEO platform and I can’t wait to see how it evolves in the future. Have you been using the new toolbar? Let us know what you think and if you have any other features you’d like to see added in the future!

Posted by & filed under Facebook Ads.

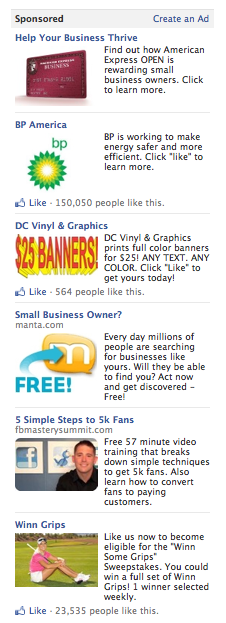
Increased Facebook ad spaceWe noticed an interesting change in Facebook today which could potentially have an effect on Facebook Ad Pricing.

Historically (at least over the past year) users have been typically shown no more than 4 Facebook Ads at a time as they are browsing around, BUT tonight I noticed a slight change in this policy. I saw 6 ads on my news feed.

To the average Facebook user, this will probably go unnoticed, but for advertisers this is a HUGE change. At first glance, it would appear that ad space on Facebook has just increased by a whopping 50%, but don’t get all excited and create a bunch of ad campaigns. We need to take a more in depth look at the implications this will have on Facebook advertisers.

First let’s take a look at why Facebook would do this…

Thanks to Inside Facebook, we found that ads are estimated to be the second largest source of income for the social media giant, so its to be expected that they try to increase their ad revenue. The largest source of income is estimated to come from ‘Social Games’ such as Zynga & Farmville, as well as a sizable amount from Microsoft via Bing search results within Facebook.

So how can Facebook increase advertising revenue?

Simple: Increase the price of ads and/or increase the amount of available ad space. It would seem as though they are attempting both at this point since Ad prices have been going up lately.

That leaves us with two questions:

  1. How does this affect users?
  2. How does this affect advertisers?
The answer to the first question is simple; users will be completely overwhelmed with joy because they will have so many more ads to choose from. Hmm, not so much. But seriously, the effect this will have on users will most likely be minimal. Facebook has already become extremely busy with the updated News Feed and “Creeper Box,” so a few more ads as you are scrolling won’t do much.

How Will This Affect Facebook Advertisers?

Increased ad space should theoretically mean a drop in ad prices.

As advertisers compete for ad space, it becomes more crowded. Demand rises and supply diminishes due to lack of available ad space, therefore ad prices increase. Well if you increase the amount of supply by adding 2 more ad positions, ad prices should theoretically decrease at least temporarily. We’ll have to wait for the data on this to come out, but I think any possibly decrease in prices will be negligible.

Some ads will be shown “below the fold”

With 6 ads being shown, users with smaller screens won’t be able to see the bottom ads until they scroll down. Users with larger screens will see all 6 ads at all times. This creates complications with both impressions and click through rates. If 6 ads are shown for the user with the smaller screen but that user never scrolls down, will that still count as an impression? If so, the true number of impressions your ads are seeing (actually being viewed, not hidden below the fold) will be lower than the actual number of impressions Facebook is saying you received. This will have obvious implications on click-through-rates since that impression count won’t be accurate. One question which we don’t have the answer to is: Will Facebook introduce a way to not count these below-the-fold impressions, if they haven’t already.

Change’s in the ad pricing structure

Facebook ads are different than Google ads because they are based on Demographics not Search Query. This means that Facebook most likely calculates ad costs based on the demand for advertising for a specific demographic. More competitive demographics will yield a higher cost per click for advertisers. With this demographic based pricing structure you will see some crossover in demographics, which may have an effect on ad positioning.

For example: I like swimming, poker, and internet marketing. These are three unrelated interests, but at any given time I could be seeing ads from businesses within all three demographics. It just so happens that internet marketing is an interest that is in high demand with Facebook advertisers, so Facebook will most likely charge a higher cost per click for these ads than the ads for swimming products.

The question at hand here is how does Facebook rank these cross-demographic ads that represent different pricing levels. Will ads that are targeting high-demand demographics be given higher positioning because they are paying more, or will that not have any bearing. Will this widen the pricing gap for ads? Pay more and be shown above the fold, or pay less and spend most of your time waiting for users to scroll down and see you.

TIMELINE

Ads Shown on TimelineAnother factor to take into consideration is the new Timeline layout for profiles. When looking at the profile of a user who already has timeline, you’ll notice that there is only one position for ads (2 if you have a larger screen). This will be another huge factor because the potential ad space could shrink again. An interesting way for Facebook combat this is by showing sponsored stories in the new “Real-Time Ticker,” which is something that is in the works according to Mashable.

There are so many factors that will determine how this new change will affect Facebook advertising that its tough to say exactly where all of this is headed. We’ll do our best to cover each topic in more detail as we learn more.

Posted by & filed under Facebook, Facebook Ads.

If you are looking into advertising on Facebook, you are probably wondering what the effectiveness of Facebook Ads is.

Unfortunately there is no real definitive answer to how many likes you can get from Facebook ads because so many factors need to be taken into consideration. Based on our experience with Facebook Ads, we can give you some guidelines for what to expect.

If you have any experience with Google Adwords, you’ll notice some distinct differences between Facebook PPC and traditional PPC (most notably with cost per click and click-through rates).

Facebook Ads Guide

Expected Impressions

What we have found is that for every $200 you spend in Facebook ads, you can expect approximately 1 million impressions (how many times each individual ad is shown). How effective your campaign is from there ultimately depends on how well your campaign converts into clicks and ‘likes’.

Click-Through Rate (CTR)

Out of those 1,000,000 impressions, you can expect click-through rates to be anywhere from .010% to .040%. This is basically a gauge of how effective each ad is. The higher the click-through rate, the more effective your ad is in making people feel the need to click on it and see exactly what you are talking about. Hint: Eye catching pictures work wonders in helping to raise your click-through rates.

With traditional PPC (Adwords), you would expect there to be far less impressions but a much higher click-through rate.

Cost Per Click (CPC)

The cost per click or CPC with Facebook ads is significantly lower than Google Adwords. We see the majority of our CPC at around $1.00 per click, but yours will vary depending on where you are advertising, demographics, and competition. Unfortunately, the days of $1.00 clicks on Google have come and gone. You can expect to spend from $2.00/click to well over $10.00/click with Google Adwords depending on how competitive your keywords are.

So, with your 1 million impressions, it is well within reason to expect roughly between 175-225 clicks for every $200 you spend.

Like Conversion

Here’s the tough part though: How do you convert as many of those clicks to likes as possible?

There are many strategies you can employ to increase your ratio of Clicks to Likes, and we’ll cover those in more detail in further posts on this topic.

For now we’ll leave you with a quick tip: Using contests in conjunction with Facebook Ads has increased our Click/Like conversion rates by between 35-50%. Bottom line: people love free stuff. This is also a great way to keep your fanbase engaged, entertained, and more likely to share your content.

Posted by & filed under Backlinking, SEO Blog.

SEO is NOT rocket science.

I know, hard to believe judging by what some companies charge for SEO services, it has to be more complicated than we are first led to believe, right?

Not necessarily.

Here are a few simple SEO tips and tricks to get you started, so you have at least a basic idea of the concept of Search Engine Optimization. Once you have that, its just a continuous process of building upon what you already know.

SEO In A Nutshell

Search Engine Optimization, commonly referred to as SEO, is the process of optimizing a website (or group of websites) to get as much targeted web traffic as possible. It is hands down the most important aspect of any internet marketing campaign, and often the most expensive as well. I might also add that it comes with little to no guarantee of results, with plenty of scam artists and overnight gurus littering the SEO landscape.

SEO Search EnginesAs we have progressed through the first 2 decades of the internet’s existence, Google has emerged as the 800lb Gorilla when it comes to determining who sits atop the search engine rankings. Google is the number #1 ranked website on the internet today, and your goal when setting up your SEO campaign is to make them happy. Play by their rules as best you can, and you’ll set up a solid foundation for a steady flow of internet traffic for years to come.

So how does it all work?

What this all boils down to is a big popularity contest (if not the biggest popularity contest). When Google analyzes your website, they take a multitude of factors into consideration.

  • Keywords
  • Number of Incoming Links
  • Quality of Incoming Links
  • Internal Linking Structure
  • Activity (traffic, commenting, time on site, etc.)
  • Page Titles & Descriptions
  • Keyword Placement Within Content
  • New Content

Over the next few weeks we will be breaking each of these down in detail, so you have a better idea of what all this means and how to put it to work for you. A little free advice if you plan on doing your own SEO, and a little peace of mind for our current and prospective clients that we know what the heck we are doing. 🙂

For now let’s go over a few basic SEO tips to get the ball rolling.

1. Planning, Research, and Overall Strategy

Any marketing strategy requires extensive planning and research before it is put into action, and SEO is no different.

First, establish exactly what niche you are going after. Now, how is your site or company different from the next and what is your mission. Lots of traffic is great, but if you can’t convert your visitors to customers, you’re missing a big part of the equation.

Spend a day researching what sites are at the top of the search engines. Look at their Alexa ranking, and look at what keywords they are using (right-click on a blank part of their site and look at the source code). Research all of those keywords further to determine how much potential traffic is available, and also how competitive each keyword phrase is. Determine what keywords and keyword phrases you will go after, then move on to the next thing.

2. A Blog

A self-hosted wordpress blog is an absolute necessity these days. Search engines love them, and you will too once you see the traffic you get from them.

You can either build your entire site on a the wordpress platform, or just the blog portion. We use Studiopress themes for almost all of our sites because they are super easy to use and customize, and they are easily the best themes available for SEO.

3. Consistency

In order to impress the Google monster, you have to come up with new content on a regular basis. I would recommend posting at least once per week minimum, but just remember the more you post the faster your site grows and climbs up the search engine rankings. Think of it as fishing. Each post is another line you cast out into the internet. The more lines you have out, the more places people can find your content.

This is probably the toughest part of a good SEO campaign, but you’ve just gotta do it.

4. Good Internal Linking Structure

Google wants your site to be easy to navigate, and having a good internal linking structure means that you allow people to find your content easily. Linking from one piece of content to another relevant piece not only makes Google happy, but it also keeps people on your site longer. Let them get lost in your high quality content, and they’ll always come back for more.

This seems very easy on the surface, but it can get very complicated and time consuming. We use this strategy to not only increase the rankings of the site as a whole, but also to increase the rankings of specific pages.

More on this in later posts.

5. High Quality Backlinks

Here’s the biggest part of the whole popularity contest concept. The more relevant sites you have linking back to yours, the more popular your site is in Google’s eyes. The quality of the site the link comes from also plays a big part in how much effect it has on the overall ranking of your site.

Backlinking is much more complicated than that, but that’s the general concept. This can also be very time consuming and tedious. Great places to start getting backlinks are other blogs in your niche, forums, and article marketing.

6. Social Media

Leverage Social Media as much and as often as you can. This is your number one tool for driving traffic in the beginning stages of your site, and throughout the life of your site.

The core sites you should focus on are Facebook, Twitter, Linkedin, Delicious, Digg, Stumbleupon, and Reddit. Each has its own personality and purpose, so you will just have to dig into each and start using them on a regular bases. Believe me, it will pay off.

Lastly, Optimizing your site for the search engines takes time. This is a long term strategy and commitment, but its 100% worth it. Stayed tuned as we break each aspect down further!

Posted by & filed under Facebook, Facebook Ads.

When pursuing any form of marketing, it is an absolute must that you create a marketing budget. Facebook is obviously a fairly new advertising medium, and at Simple Logic Studio we often hear the question from our current and potential clients, “Is there a recommended minimum Facebook Ads budget?”

While there is no minimum budget requirement from Facebook, you should initially set your budget based on two factors:

  1. How much your business can afford
  2. How quickly you want to build your initial audience

Let’s start with the first because that will help us determine how to proceed with the second part of this equation.

Facebook Ads For BusinessAt this point you should have a number in mind, either monthly or annually, for how much you want to spend (or can afford) on internet advertising. There are many different advertising mediums online, so be sure to assign a percentage of your budget to each specific medium.

Now, say for instance you set aside $4,200/year specifically for Facebook Ads, you have a monthly budget of $350/mo (I normally tell my clients at least $200/mo minimum). At this point, there are two primary strategies you can implement with your budget.

The first is pretty straightforward, and that is to simply set your monthly budget at $350/mo. and be done with it. If you have an already established page with 250-500+ fans, this budget strategy will work perfectly fine. You’re fanbase will continue to grow at a steady rate.

The second strategy we like to use, especially with brand new Facebook pages, is something we call the “Staggered Budget.” What we’ll do in this scenario is to stagger your annual budget so that at least 50% of your annual budget is used in the first two months. Why?

To understand exactly why, you have to understand why you are promoting your business on Facebook in the first place.

Facebook is the perfect medium to create conversation with your current and potential customers. As you engage with your Fans, parts of that conversation will spill out into each fans own personal network, or your “Secondary Fanbase Network.” This is comprised of people who are not already connected with your page directly, but are friends with someone who is. This spillover could happen in the form of a comment, “Like,” or ideally the sharing of a piece of your content with Facebook users who don’t already know who you are.

As this happens, the size of your ‘conversation’ grows, your content will be shared more and more, and you will start to pick up new Fans ‘organically’ or naturally. This is the ultimate goal, and when you get to this point your Fanbase will grow exponentially (as long as you treat them right!)

To put it simply, you are building an army of marketers. This army loves you and your products because you entertain them and take care of them, and they are therefore more than happy to share your products and content with their friends. Word of Mouth advertising at its finest.

So, back to the “Staggered Budget.”

In order for the natural organic growth mentioned above to start, you must have that initial audience, and you want it as big possible. The more fans you have to start, the larger your “Secondary Fanbase Network” is.

This is why we spend so much more on Facebook Ads in the very beginning stages of growth. We also like to have a contest during these first few months where you give away some cool gadget, product, or discount to entice more likes.

Posted by & filed under Facebook, Web Design Blog.

Shortly after publishing last week’s post on Facebook’s recent changes to the “Like” and “Share” buttons, I realized Facebook made a glaring mistake when creating this new structure.

facebookWith this new structure, when you click “like” on a website or post, you don’t get to choose which thumbnail is selected to show up in your news feed and on your wall. Instead, a random image is pulled from that website and included with the content you are now “sharing.”

This would all be well & good if the default image selected was actually relevant to the post, but in most cases a random image from the website is chosen. As a website owner, you want your content to look exactly how you intend it to when its shared, not with some random image that has very little to do with the actual post.

An example:

Here’s a post that I liked a couple weeks ago.

New Facebook Like

You can see that the post I liked was about a “Blue Bentley Continental,” but the image that was shared with the post has nothing to do with a Bentley. Its actually one of the manufacturers Joe’s Stereo carries, and that image was just pulled at random by Facebook.

Obviously if you are a website owner, you don’t want this to happen. But even if you are simply a Facebook user and you are sharing content, you don’t want random images showing up on your wall. You want images that are relevant to whatever it is you are “liking.”

Now I’m sure Facebook will be all over this and they’ll come up with a fix eventually, but in the meantime how do you protect your brand and correct this problem yourself?

For those of you who have wordpress blogs, the fix is as easy as installing a plugin.

Here’s the extremely helpful original blog post from Ashfame that helped me correct this problem

http://blog.ashfame.com/2011/02/wordpress-plugin-fix-facebook-like-thumbnail/

Basically all you need to do is download the plugin from the link above OR install the plugin from inside the WordPress admin area. Just go to ‘Plugins’ then ‘Add New’, then search for “Facebook Like Thumbnail.” That should bring up Ashfame’s plugin which you just need to install and activate.

What the plugin does is tell Facebook to select the first image from that particular post OR select a default image from the site in the case that there are no images in the post.

In order to set the default image, you need do some simple editing to the plugin itself. Once you have it installed and activated, click ‘edit’ from the Plugins page.

Edit WordPress Plugin

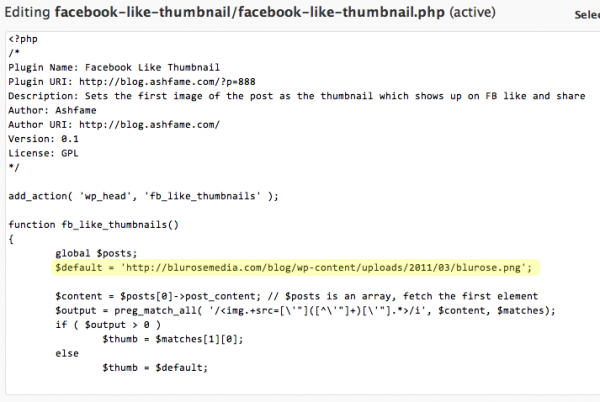
From there, decide which image you want to be the default image (your logo will work fine), and then enter the web address of that image in the plugin code just as I did in the image below.

Edit Facebook Plugin

Save the changes you made and you’ll be good to go!

One minor note: the changes won’t take effect immediately because Facebook crawls your site only once every 24 hours. Give it a day or so and you’ll be set until Facebook makes the next round of changes!

Social Media Management San Diego

Posted by & filed under Web Design Blog.

What are RSS Feeds?

RSS Feed You see them on virtually every website/blog these days, but do you really know what they are? More importantly, do you know how to use them effectively?

Contrary to popular belief (or just pure ignorance on the topic), RSS feeds are quite valuable when it comes to content syndication.

So what the heck are RSS feeds anyways?

They are basically a simple subscription tool for content syndication. When you subscribe to an RSS feed, you’ll be notified every time there is new content on that particular blog (or feed).

How are you notified? (where feeds show up)

The most basic way to subscribe to an RSS feed is to subscribe by email. Whenever your favorite sites publish new content, you get that content sent directly to your inbox. You can actually read the blog post from your inbox without ever visiting the site, which is a pretty useful feature (though publishers would love for you to actually visit their site & browse around :)).

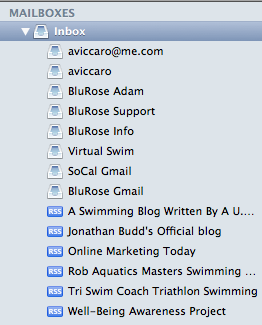
My Apple mail client with some of my RSS feeds on the bottom…

Inbox RSS Feed

How do you subscribe to a feed?

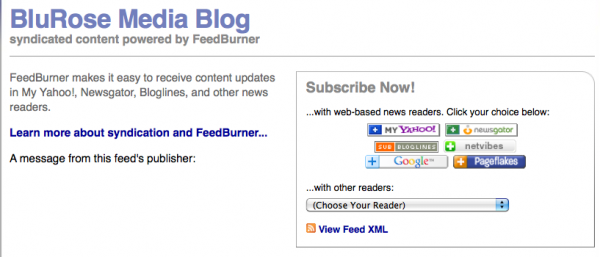
This is the really easy part. Next time you find a site that you are interested in (just like a magazine you’d like to subscribe to), click on the RSS icon and you’ll most likely be taken to a page similar to this…

BluRose Feedburner

Just pick your reader and set your subscription, and you are good to go!

How do you create your own RSS feed?

If you have a blog, it should come with an RSS feed already built in, but I recommend using Feedburner by Google just to simplify things. Go to www.feedburner.com and sign in with your Google account. From there just follow the instructions, and burn your first feed. You should now have a simple feed address that’s easy to remember.

Getting Creative With RSS Feed Content Syndication

For those of you out there who are more the content syndication types rather than just readers, RSS feeds will definitely simplify your life and allow you to focus your time on finding the good content rather than syndicating it.

How to syndicate content on Twitter

Sometimes its tough to stay consistent with your Twitter activity, but by using RSS feeds you can be sure you are always sharing valuable content with your followers. I use TwitterFeed to syndicate some of my content from multiple feeds, across multiple twitter accounts. This helps to keep the valuable content flowing, all on autopilot.

*Note: I recommend using TwitterFeed only for Twitter. You can syndicate your content to Facebook as well, but the links are easily recognizable as automatic feeds AND they are shared without images (thumbnails). Sharing content on Facebook with images is highly recommended to get more clicks.

First, go to TwitterFeed and sign up for an account. Then follow the instructions and establish your feed, set the Twitter account or accounts you are syndicating to, and you are good to go.

You can setup multiple feeds for each twitter account, but don’t go crazy. Some people have so many feeds that they are tweeting every few minutes, which I find to be too much & frankly just too robotic & automated. Put a few valuable feeds on there and leave it at that. Your followers will thank you for the good content instead of unfollowing you for blocking up their twitter feed.

Syndicating content across multiple social networks

By far the best tool I have come across for effectively scheduling & syndicating content across multiple social networks & bookmarking sites is Hootsuite. It blows the socks off of Tweetdeck and i’ll go into why in later blog posts. I won’t go into exactly how to use Hootsuite in this post, but once you know how to burn feeds & syndicate them (like with TwitterFeed), you should be able to figure out how to do the same in Hootsuite.

Posted by & filed under Facebook, Social Media Blog.

Facebook recently made a big change which may actually fly under the radar of most users.

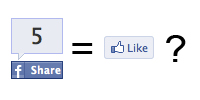
The old “Facebook Share” button has now become the “Like” button.

Facebook Share = Like

Big deal right? The average facebook user may not even know the difference, but that is exactly why this change is so powerful. Here are the details…

Most facebook users tend to be more liberal with their “Likes” than their “Shares.”

Why?

Well in the past, when you simply “Like” a website or blog post, a tiny snippet will show up on your friends’ news feed like this “Adam Viccaro just liked About BluRose Media on www.simplelogicstudio.com” Most users didn’t even notice that this was happening because it never showed up on their own news feed, nor did it show up in great detail on their profile (usually just the above quoted text, but rarely at the top of their profile). Less intrusive basically means users are more liberal with their “Like” button clicking.

Similar to this…

Old Like Button

On the other hand, when users clicked the “Facebook Share” button on a website or blog post, two things happened. They were asked to share the post with an image and excerpt, and if they felt the need, they could comment on the post as well. The post or page would then show up on their news feed as well as at the top of their profile. Much more intrusive, and people tend to only share things that they REALLY liked because of this fact.

Old Share Button

This is why you typically go to a website and see that ~100 people like a post, yet it was only shared ~20 times.

Well, the game has changed, and the “Like” button just inherited all aspects of the old “Facebook Share.”

New Like Button

What does that mean for you as a business owner?

It means you need to take full advantage of that fact by making sure you have the “Like” button on all of your content. Most users will not realize the change that has taken place, so they will still be very liberal with their “Likes,” and you need to allow them to share your content as much as possible.

If you have a WordPress blog, make sure you are using the following social plugins:

You can customize each of these plugins to allow visitors to share your content on virtually every social network/bookmarking site available.

Hint: Don’t just choose the networks/bookmarking sites YOU use. Find a core group of bookmarking sites that fit well with your niche, and add those in. Just because you don’t use those other sites (you should!), you may have a visitor who is well networked on a different site, and you want to allow them to share your content on that other bookmarking site.

Take a look at some of our client sites for examples, or contact us for a consultation!

Posted by & filed under Web Design Blog.

Whether you are an individual or a small business getting started in the world of blogging and social media, you’ll eventually be faced with the dilemma of wordpress.com vs wordpress.org.

For you confused souls (like myself at first), what follows should shed some light on this dilemma and identify which one of the two types of WordPress suits your needs better.

For starters, WordPress is a good open source blog publishing application that is powered by a general-purpose scripting language and a relational database management system, PHP and MySQL. In english, a great central location to publish & store content so your audience can follow what’s going on in your world.

There are two forms of WordPress: First, the self hosted WordPress.org which requires your own hosting package to operate, and the free WordPress.com which does not require any hosting on your part. Both offer a powerful content management system which allows users to build websites and blogs, yet there are some distinct advantages and disadvantages to each platform.

Here’s the breakdown…

WordPress.com (Free)

  • The primary advantage of using WordPress.com is it’s cost– FREE! And it’s running on multiple, maybe hundreds, of servers which gives you peace of mind that your website will be up and running with minimal downtime.
  • This option is also very easy to setup and does not require extreme technical knowledge. Just pick a theme, select some widgets, add your content and start publishing.
  • Because of its simplicity & ease of operation, these blogs are not fully customizable, but do have a lot of themes to choose from. If you want the ability to edit CSS, you would need to upgrade to a self-hosted wordpress.org blog.
  • If you are looking to monetize your blog by selling ads, you are not going to make money here as you’re not allowed to sell ads. You may even have to put up with unwanted wordpress ads showing up that could potentially be detrimental to the integrity of your website.

WordPress.org

  • You need to provide your own web hosting, meaning it may require you to pay a small amount to acquire a hosting site. If it’s not a good one, your site can potentially go down if there’s a huge spike in traffic. Check out MediaTemple for reliable hosting.
  • Using this form requires technical knowledge such as FTP to transfer files, minor HTML & CSS, etc. If that last sentence makes your head spin, you are probably better off starting with wordpress.com OR let the professionals at Simple Logic Studio do all the dirty work for you.
  • Offers a complete control and flexibility of content, meaning you can upload themes, edit themes that exist, plugins, advertising and most of all maintain the integrity of your company brand.
  • LAST & MOST IMPORTANT – Search Engine Optimization! You want your content to generate traffic to your domain, not to the wordpress.com domain. Blogs are extremely effective tools for generating traffic & building a solid foundation of search optimized content. If you have a business or think your blog may be valuable in the future, don’t even think about wordpress.com. Get yourself a wordpress.org blog and you’ll thank yourself (or us!) later.

Depending on your objective and long-term goals, you should select something that will specifically suit your needs, objectives, knowledge, budget and commitment.

Posted by & filed under Facebook, Social Media Blog.

The new Facebook profile has created an almost seamless flow of information from one area of Facebook to the next, but most people are failing to take full advantage.

The first thing that I’ve noticed with literally every profile I’ve come across is that most people are not connecting their profile page to their business fanpage. If you are a business owner or the marketing director at your company, this can be extremely valuable and it will give your profile a much more professional look.

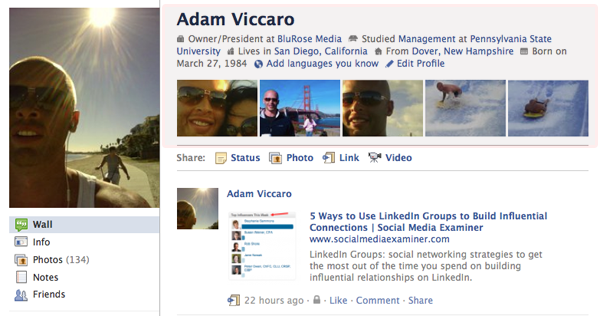
The new profile was designed to give friends/visitors/creepers a brief overview of who you are before they get into exploring your wall, info, photos, etc. Here’s a screen shot to illustrate what I’m talking about…

New Facebook Profile

At the very top of my profile it gives a quick overview of who I am. Where I work, where I went to school, where I live and my hometown, etc. Below that are the 5 most recent pictures I’ve been tagged in, and below that is the top of my wall. To the left is my profile picture and a navigation bar that lets people explore my profile more.

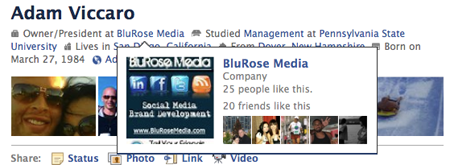
Now if you take a look at the top portion again, you’ll see that each detail of the overview has blue text which indicates a link to another page. In fact, if you just hover your mouse over each link, Facebook will give you a quick summary of where that link goes.

Facebook Profile HoverFacebook Info Page Hover

If you were to hover over the other links, a similar summary would pop-up and if you actually click on the link, you’ll be brought to that fanpage/interest page.

You’re info page follows a similar format as well which you can see in the second image.

If you are a business owner, this is great visibility for your business on Facebook and it adds a level of professionalism as well. When you don’t have this connected correctly, people may click on that link to see more about your company, and they’ll be taken to a random page rather than your actual business fanpage. Unfortunately most people don’t have their profile and business pages linked together properly.

Fortunately this is extremely easy and takes all of a minute or two (as long as you already have a fanpage for your business).

First, you’ll need to create a fanpage for your business if you haven’t done so already. This is fairly easy to get started, but if you would like to have it set up professionally with custom images and a welcome page, you know where to look. ==> Social Media Design

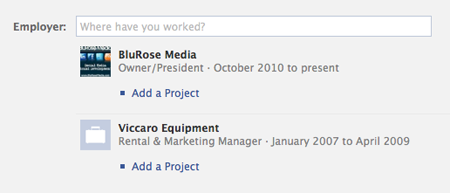
Once you have your page established, go to your profile and edit your “Education and Work” on the info page. When you enter your business information in under “Employer”, be sure to use the exact name of the fanpage for your business. Edit Facebook Work InfoAs you type, options should show up for you to select, and you want to choose (by clicking on it) your exact fanpage. If you simply type the business name in, but you don’t select an actual fan page, Facebook may not make the connection between what you typed in and the fanpage.

I’ve seen quite a few high profile business owners fail to do this with their profiles and it just goes to show how fast Social Media is changing. Facebook is making changes constantly, so it is tough to keep up, but keep checking back with us and we’ll do our best to keep you up to date on new Social Media tips & tricks.

Be sure to share this post if you found it valuable!